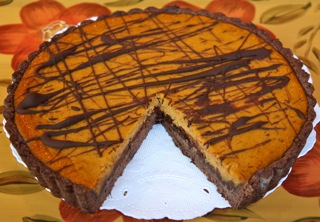
We love to modernize traditional holiday recipes. What better way to sass up a pumpkin pie for Thanksgiving than by adding chocolate?
This tart with a triple chocolate whammy will delight your guests this holiday season and keep them wondering what palate pleasers might await them at your next family gathering.
INGREDIENTS
Note: You will need a 10-inch tart pan with removable bottom
Chocolate Crust
- 1 cup all-purpose flour
- 1/4 cup + 1 tablespoon granulated sugar
- 1/4 cup unsweetened cocoa powder
- 1/2 teaspoon salt
- 1/2 teaspoon ground cinnamon
- 1/2 cup (1 stick) unsalted butter, cold
- 1 large egg
- 4 ounces semi-sweet chocolate, chopped into small pieces (see Carpool Crunch)
Pumpkin Filling
- 1 (15 ounce) can pumpkin puree
- 3/4 cup tightly packed light brown sugar
- 8 ounces crème fraîche
- 3 large eggs
- 1 teaspoon ground cinnamon
- 1 teaspoon ground ginger
- 1/4 teaspoon ground nutmeg
- 1/4 teaspoon Pumpkin Pie spice
- 1/4 teaspoon salt
Chocolate Drizzle
2 ounces semi-sweet chocolate (for Chocolate Drizzle)
DIRECTIONS
Step One: Make the Crust
Place the flour, granulated sugar, cocoa powder, salt, and cinnamon in the bowl of a stand mixer fitted with the paddle attachment. Mix on low speed (#1). While the mixer is on, cut small pieces (one tablespoon at a time) of butter into the bowl. Increase speed to #2 and continue to mix for 4 to 5 minutes, until all ingredients are combined. Add egg and mix until dough is formed.
On a lightly floured work surface, use a rolling pin to roll out the dough until it is 1/8” thick with a diameter slightly larger than the tart pan. Gently lay dough into tart pan. Press dough onto the bottom and up the sides of the pan. Cut off any excess (see Sugar Mommas Tip). Use a fork to prick the bottom and sides of the dough. Chill in the refrigerator for 30 minutes. Preheat oven to 350ºF. Bake crust for 15 minutes. Do not overcook. After removing shell from oven, immediately sprinkle chocolate bits across the bottom. Leave oven on at 350ºF.Step Two: Make the Filling
While the crust is baking, place all filling ingredients in the bowl of a stand mixer fitted with the whisk attachment. Whisk until ingredients are well combined and puree is smooth. Pour filling into pie crust (pour any excess into your ramekin, per Sugar Mommas Tip). Bake for 40 minutes, until the filling is set (check ramekin at 30 minutes). Remove from oven and let cool at least 30 to 45 minutes.
Step Three: Prepare Chocolate Drizzle
Using a double boiler or a metal pan nestled over a saucepan of boiling water, melt chocolate, stirring often so as not to scorch. Remove from heat when melted. Move tart onto a piece of wax or parchment paper so you can make a mess guilt free. Dip a fork into the chocolate and then wave vigorously back and forth over the tart to make chocolate strings. Go to town, fling that fork to make any design you desire. Concentric circles?? Refrigerate until set. VOILA!
Sass it Up: Instead of the standard Hershey’s unsweetened cocoa powder, explore some of the options on the market. Try Scharffen Berger Natural Cocoa Powder, Valrhona Unsweetened Cocoa Powder, or Ghirardelli Unsweetened Cocoa Powder. These gourmet products really increase the WOW factor.
Carpool Crunch:
-Instead of chopping up small pieces of chocolate, just use 4 ounces of mini morsels and spread those bits around the pie crust.
-If you don’t have the time or patience to melt chocolate over a double broiler, put the chocolate in a glass bowl and cook in the microwave on medium power for 30 seconds. Remove, stir, and repeat process until chocolate is melted. Be careful not to overcook or scorch.
-If you don’t want to make the chocolate crust, just go to the market and get a chocolate ready made pie crust, pour in the filling, bake and drizzle. We’ve used the chocolate crusts at Whole Foods (Shhh).
Sugar Mommas Tip: Why waste dough? Take the excess you trimmed from your tart shell and place it into the bottom of a small ramekin. Proceed with the balance of directions above to make yourself a mini tart for a snack. You want to test the merchandise before you serve it to your guests, don’t you?
Happy Thanksgiving!
The Sugar Mommas


